蛇ノ目の記

技術のことも。そうでないことも。

Software Design2018年9月号にて「データ分析にPythonが選ばれる理由」を執筆しました

というわけで記事を執筆しました。とうとう著者デビューしたので著者ページ作ってみました。著者画像も経歴もまだないけど。

Amazon.co.jp: 横山 直敬:作品一覧、著者略歴

さて、この記事はPython初学者向けを意識して、以下の4つに焦点を当てています。

  • データ分析におけるPythonの強み

  • データ分析のための環境構築

  • 手軽に入手できるデータセットの紹介

  • ボストン市地域別平均住宅価格データの分析を体験

データ分析といえばAnacondaが便利ですが、condaとpipが混在しているせいでハンズオンで躓いたという事例をよく聞くので、Anacondaを使わずPython3.6.6とvenvを使った環境構築を説明しました(執筆中に3.6.6と3.7が出たときは少し焦った)。

データセット紹介ではscikit-learn付属データセットとKaggle Datasetsについて触れています。データ分析体験では、線形回帰を使って住宅の部屋数から住宅価格を予測します。

Pythonによるデータ分析を手軽に体験できる記事に仕上がっていると思います。ぜひお手にとってみてください。

Special Thanks

  • レビューしてくれたBPのみなさん

  • 技術評論社の編集者さん

  • 告知ツイートをRT,いいねしてくれた人たち

  • これから雑誌を買ってくれる・買ってくれた人たち

tagmineをリリースしました-酷暑のイベントの緊急時に役立つWebアプリ

tagmineをリリースしました。

f:id:Nao_Y:20180809010509p:plain

tagmineとは

熱中症などで倒れたとき、医療処置に役立つ情報を埋め込んだQRコードを作成するWebアプリです。

QRコードに埋め込める主な情報

  • 氏名
  • 血液型
  • 既往歴
  • 緊急連絡先

QRコードは名刺サイズのカードとして表示されるので、印刷して使うことができます。財布の中やネックストラップの内側に入れるといざというときに見つけてもらいやすいでしょう。

少し前にこんなtogetterまとめを見て、QRコード版ドッグタグを作ってみようと思ったのがきっかけです。

togetter.com

コミケが8/10から始まります。今年も暑くなりそうですので、活用してもらえたら嬉しいです。

tagmineの中身の話はまた後日。

herokuのProcfileに書くgunicornのコマンドにハマった話

herokuで動かすWebアプリがどんなプロセスを使うかを定義するProcfile

Procfileはドキュメントルートに置き、例えばFlask + gunicornを使うときには web: gunicorn app:appとする。古事記にもそう書いてある(heroku公式ドキュメントやいろいろなブログ)

heroku公式ドキュメント: Deploying Python Applications with Gunicorn | Heroku Dev Center

その教えに従ってProcfileを作成したが一向に動かない。

Failed to find application object 'app' in 'myapp'

と表示されるばかり。

ディレクトリ構成はこんな感じ。

flask_app
├ Procfile
├ requirements.txt
├ runtime.txt
└ myapp
  ├ myapp.py
  ├ static
  └ templates

一度myappディレクトリに移動する必要があるのでは、と考えて

web: gunicorn --chdir myapp myapp:app

と書き換えたところアプリが正常に動いた。

作ったWebアプリの話はまた後日。

追記

アプリのディレクトリを分けずに以下のようなディレクトリ構成にすることで、Procfileにディレクトリ移動を書かなくてよくなる。アプリのディレクトリを分けているとローカルでの実行やパッケージングで不便になる、と@shimizukawaからアドバイスをもらった。ありがとうございます。

flask_app
├ Procfile
├ requirements.txt
├ runtime.txt
├ myapp.py
├ static
├ templates

また、herokuの環境変数PYTHONPATHをPYTHONPATH=myappsと設定すると、アプリのディレクトリを分けていてもProcfile実行時のディレクトリ移動が必要なくなる。と@shimizukawaからアドバイスをもらった。ありがとうございます。

ユニットテストで躓いたところ - mock.patch()

単純なスクリプトユニットテストを書いていて躓くことがあったので、解決法をメモ。

例えばこんな、おみくじをするだけの簡単なスクリプトがあるとする。

import random


fortunes = {
    1: '凶',
    2: '吉',
    3: '大吉'
}

number = random.choice([1, 2, 3])

fortune = fortunes[number]

print(fortune)

変数numberに1〜3までのランダムな値が入って、対応する運勢が出力される 。random.choice()の部分をパッチして、期待通りの運勢が出力されることをテストする。

import unittest

from importlib import import_module
from unittest.mock import patch


class FortuneTestCase(unittest.TestCase):

    @patch('random.choice', lambda x: 1)
    def test_bad(self):
        module = import_module('fortune')
        expect = ('凶')
        self.assertEqual(module.fortune, expect)

    @patch('random.choice', lambda x: 3)
    def test_good(self):
        module = import_module('fortune')
        expect = ('大吉')
        self.assertEqual(module.fortune, expect)

さて、このテストを実行するとどうなるか。

(env) $ python3 -m unittest tests.test
凶
.F
======================================================================
FAIL: test_good (tests.test.FortuneTestCase)
----------------------------------------------------------------------
Traceback (most recent call last):
  File "/usr/local/Cellar/python/3.7.0/Frameworks/Python.framework/Versions/3.7/lib/python3.7/unittest/mock.py", line 1191, in patched
    return func(*args, **keywargs)
  File "/tests/test.py", line 21, in test_good
    self.assertEqual(module.fortune, expect)
AssertionError: '凶' != '大吉'
- 凶
+ 大吉


----------------------------------------------------------------------
Ran 2 tests in 0.029s

FAILED (failures=1)

test_goodメソッドのアサーションで例外が発生する。パッチした値が反映されていない。つまり初めに実行されたtest_badメソッドでパッチした値がそのまま使われている。

値がパッチされっぱなしなのではれば、モジュールを読み込み直してみる。importlib.reload()を使う。

Python3 公式ドキュメント importlib - reload

import unittest

from importlib import import_module, reload
from unittest.mock import patch


class FortuneTestCase(unittest.TestCase):

    @patch('random.choice', lambda x: 1)
    def test_bad(self):
        module = import_module('fortune')
        expect = ('凶')
        self.assertEqual(module.fortune, expect)

    @patch('random.choice', lambda x: 3)
    def test_good(self):
        module = import_module('fortune')
        reload(module)
        expect = ('大吉')
        self.assertEqual(module.fortune, expect)
(env) $ python3 -m unittest tests.test
凶
凶
.大吉
.
----------------------------------------------------------------------
Ran 2 tests in 0.025s

OK

無事テストが通った。テストメソッド実行ごとにパッチされると思っていただけにこの動きにだいぶ悩むこととなった。

公式ドキュメントに以下の注釈があるためtest_goodメソッドでだけreloadを使った。

注釈 :いろいろなテストが実行される順序は、文字列の組み込みの順序でテストメソッド名をソートすることで決まります。

https://docs.python.jp/3/library/unittest.html#organizing-test-code

BokehでグラフをJavaScriptとして出力してWebページに埋め込んでみた

グラフをWebページに埋め込んで、インタラクティブなWebアプリっぽくしたい。でもJavaScriptわからない。そんなときにBokehのembed.componentsを使おう。

Bokehのバージョンは0.13.0を使っている。

bokeh.pydata.org

componentsに描画するグラフのFigureオブジェクトを渡すと、JavaScriptを記述したscriptタグとグラフ部分のdivタグがタプルとして返ってくる。

scirpt, div= components(plot)

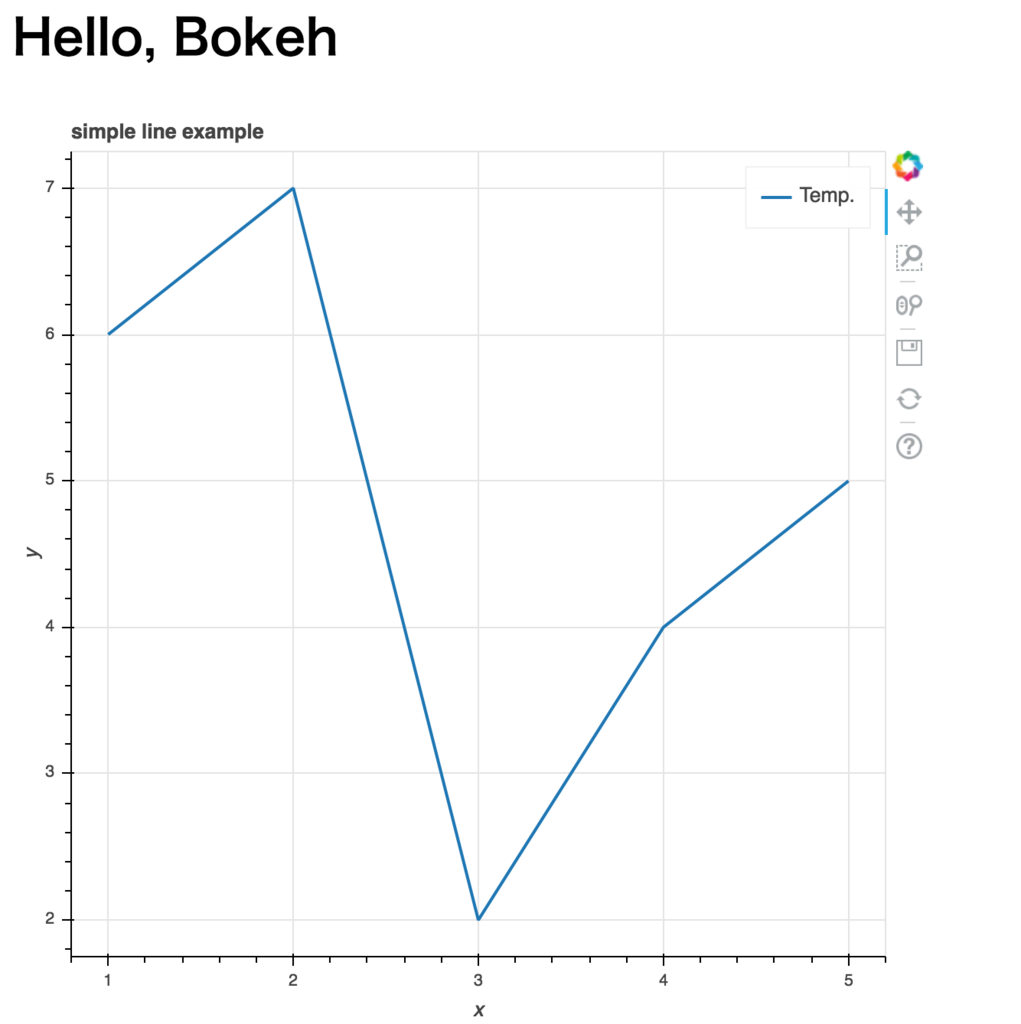
手始めにBokehのQuickstartにある折れ線グラフを表示してみる。

bokeh.pydata.org

from bokeh.embed import components
from bokeh.plotting import figure
from flask import Flask, render_template

app = Flask(__name__)


def get_line_graph():
    # prepare some data
    x = [1, 2, 3, 4, 5]
    y = [6, 7, 2, 4, 5]

    # create a new plot with a title and axis labels
    p = figure(title="simple line example", x_axis_label='x', y_axis_label='y')

    # add a line renderer with legend and line thickness
    p.line(x, y, legend="Temp.", line_width=2)
    print(type(p))

    return p

@app.route('/')
def index():
    plot = get_line_graph()
    script, div = components(plot)
    return render_template('index.html', script=script, div=div)
<!DOCTYPE html>
<html>
<head>
    <title>Flask Bokeh Sample</title>
    <link rel="stylesheet" href="https://cdn.pydata.org/bokeh/release/bokeh-0.13.0.min.css" type="text/css" />
    <link rel="stylesheet" href="https://cdn.pydata.org/bokeh/release/bokeh-widgets-0.13.0.min.css" type="text/css" />
    <link rel="stylesheet" href="https://cdn.pydata.org/bokeh/release/bokeh-tables-0.13.0.min.css" type="text/css">

    <script type="text/javascript" src="https://cdn.pydata.org/bokeh/release/bokeh-0.13.0.min.js"></script>
    <script type="text/javascript" src="https://cdn.pydata.org/bokeh/release/bokeh-api-0.13.0.min.js"></script>
    <script type="text/javascript" src="https://cdn.pydata.org/bokeh/release/bokeh-widgets-0.13.0.min.js"></script>
    <script type="text/javascript" src="https://cdn.pydata.org/bokeh/release/bokeh-tables-0.13.0.min.js"></script>
</head>

<body>
    <h1>Hello, Bokeh</h1>
    {{ script|safe }}
    {{ div|safe }}
</body>

</html>

Jinja2safeフィルタを使うことで、Flaskから渡した文字列をHTMLとして埋め込むことができる。テンプレートで気をつけておきたいのはCSSJavaScriptCDNから読み込むときのバージョン。Bokehの最新バージョンに合わせておこう。ここでは0.13.0としている。

このStackOverFlowの回答を参考にしたが、動かなかったので試しにバージョンを最新にしたら動いた。

stackoverflow.com

さて、上記のコードを実行すると以下のようなWebページになる。動かせるし、ズームも保存もできる。
f:id:Nao_Y:20180716104814p:plain

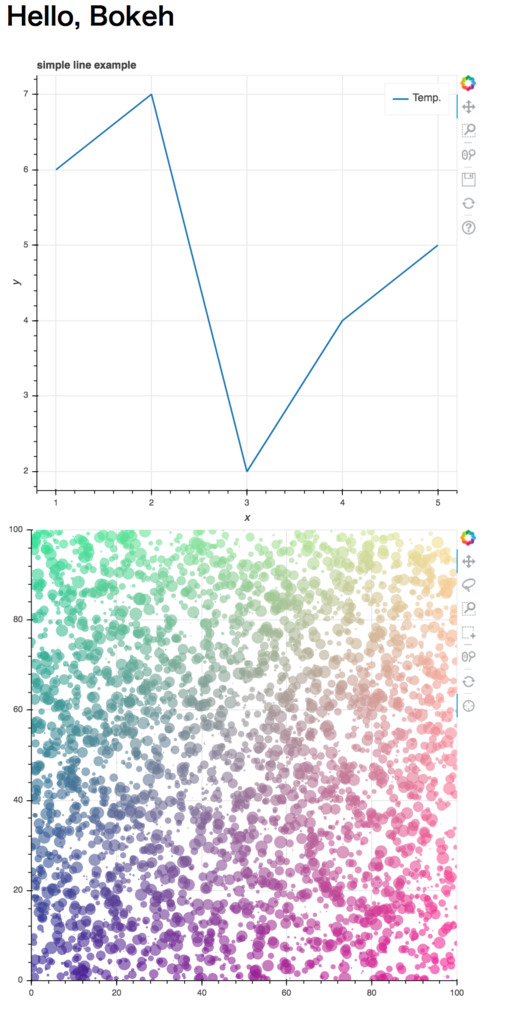
複数のグラフを埋め込むときはcomponents()メソッドにFigureオブジェクトが入ったタプルを渡す。すると、divタグがタプルとして返ってくる。

以下、折れ線グラフに加えて散布図を埋め込んだ例。

from bokeh.embed import components
from bokeh.plotting import figure
from flask import Flask, render_template
import numpy as np

app = Flask(__name__)


def get_line_graph():
    # prepare some data
    x = [1, 2, 3, 4, 5]
    y = [6, 7, 2, 4, 5]

    # create a new plot with a title and axis labels
    p = figure(title="simple line example", x_axis_label='x', y_axis_label='y')

    # add a line renderer with legend and line thickness
    p.line(x, y, legend="Temp.", line_width=2)
    print(type(p))

    return p

def get_scatter():
    # prepare some data
    N = 4000
    x = np.random.random(size=N) * 100
    y = np.random.random(size=N) * 100
    radii = np.random.random(size=N) * 1.5
    colors = [
        "#%02x%02x%02x" % (int(r), int(g), 150) for r, g in zip(50 + 2 * x, 30 + 2 * y)
    ]

    TOOLS = "crosshair,pan,wheel_zoom,box_zoom,reset,box_select,lasso_select"

    # create a new plot with the tools above, and explicit ranges
    p = figure(tools=TOOLS, x_range=(0, 100), y_range=(0, 100))

    # add a circle renderer with vectorized colors and sizes
    p.circle(x, y, radius=radii, fill_color=colors, fill_alpha=0.6, line_color=None)

    return p


@app.route('/')
def index():
    line = get_line_graph()
    scatter = get_scatter()
    plots = (line, scatter)
    script, div = components(plots)
    return render_template('index.html', script=script, div=div)
<!DOCTYPE html>
<html>
<head>
    <title>Flask Bokeh Sample</title>
    <link rel="stylesheet" href="https://cdn.pydata.org/bokeh/release/bokeh-0.13.0.min.css" type="text/css" />
    <link rel="stylesheet" href="https://cdn.pydata.org/bokeh/release/bokeh-widgets-0.13.0.min.css" type="text/css" />
    <link rel="stylesheet" href="https://cdn.pydata.org/bokeh/release/bokeh-tables-0.13.0.min.css" type="text/css">

    <script type="text/javascript" src="https://cdn.pydata.org/bokeh/release/bokeh-0.13.0.min.js"></script>
    <script type="text/javascript" src="https://cdn.pydata.org/bokeh/release/bokeh-api-0.13.0.min.js"></script>
    <script type="text/javascript" src="https://cdn.pydata.org/bokeh/release/bokeh-widgets-0.13.0.min.js"></script>
    <script type="text/javascript" src="https://cdn.pydata.org/bokeh/release/bokeh-tables-0.13.0.min.js"></script>
</head>

<body>
    <h1>Hello, Bokeh</h1>
    {{ script|safe }}
    {{ div.0|safe }}
    {{ div.1|safe }}
</body>

</html>
f:id:Nao_Y:20180716105326p:plain

以上、BokehのグラフをJavaScriptにしてWebページに埋め込む方法。

BokehのWidgetsを使うとダッシュボードめいたやつとか作れそう。

bokeh.pydata.org

PyCon APAC 2018 Day 2

前回の更新からだいぶ時間が経ってしまった。

この一ヶ月の間にPyQブログとgihyo,jpでPyCon APAC 2018記事が公開された。 あとstapy#36BPLL#22でPyCon APAC 2018行ってきたよ報告LTをした。stapyは帰国からの直行だったので抜群の鮮度だった思い出。

blog.pyq.jp

gihyo.jp

PyQブログ書いてるし、gihyo.jpに寄稿してるので実はブログ書いていたのでは。

では、PyCon APAC 2018 カンファレンス2日目に聴いたトークのまとめ。

Opening Keynote

Talk

Detecting offensive messages using Deep Learning: A micro-service based approach

by Alizishaan Khatri, Machine Learning Engineer at Pivotus Ventures

資料: alizishaan-khatri-detecting-offensive-messages-using-deep-learning.pdf - Google ドライブ

What are you doing to control abusive content on your platform? Can your current solution tell the difference between "fking awesome" and "fking loser"? Can it detect racist and sexist content? In this talk, you will learn how to build a deep learning based solution and deploy it as a micro-service.

訳:

自分(自社)のプラットフォーム上での攻撃的な言動に対してどのように対応しているでしょうか。今の解決策はf**king awesomeとf**king looserの違いを認識できますか?差別的な表現や性的な表現の検知は?このトークでは、深層学習ベースの解決策とマイクロサービスとしてデプロイする方法をお伝えします。

Pumping up Python modules using Rust

by Vigneshwer Dhinakaran, Mozilla TechSpeaker

資料: vigneshwer-dhinakaran-pumping-python-modules-using-rust.pdf - Google ドライブ

Learn to build high performance and memory safe Python extensions using Rust. Discover this and more tips to boost up your Python application.

訳:

パフォーマンスでメモリセーフなPython拡張をRustで作る方法や、Pythonアプリケーションの性能を上げるtipsをお伝えします。

How to understand user behaviour using Multiple Linear Regression?

by Sarthak Deshwal, Associate Software Engineer at Expedia Group

資料: sarthak-deshwal-how-to-understand-user-behavior-using-multiple-linear-regression.pdf - Google ドライブ

Studying the user behaviour on app/website is one of the most hot topics among product companies. Multiple linear regression exactly helps you to find out the most important factors about your user and deliver the most important features to them. We will discuss the process, and the pros and cons of it.

訳:

アプリケーションやWebサイト上のユーザの振る舞いを知ることは今、企業の間で最も熱いトピックになっています。重回帰分析はユーザについての要素を見つけたり、ユーザーに最も重要な機能を提供するのにとても役立ちます。この発表では重回帰分析を使うプロセスと、その長所と短所をお伝えします。

Elements of Programming Interviews in Python

by Tsung-Hsien Lee, Staff Software Engineer at Toyota Research Institute

資料: tsung-hsien-lee-elements-of-programming-interviews-in-python.pdf - Google ドライブ

I will educate the audience on how to solve algorithmic problems commonly asked at interviews, emphasizing the aspects of Python that are the most useful. I will also describe how hiring decisions are made behind-the-scenes, based on my professional experiences at Facebook, Google, and Uber.

訳:

コーディング面接でよく出題されるアルゴリズム問題に役立つhow toをPythonを用いてお伝えします。また、FacebookGoogle, Uberで採用に関わった経験をベースに、採用するエンジニアの決定について話します。

Learn Guitar Via Python Programming

by Rishabh Shah, Associate Tech. Architect at Systango Technologies

資料: 無し

Ever wanted to play your favourite song on a guitar quickly even when you don't know how to play a guitar? Our Python based MIDI to guitar tabs Transcriber can help you do that. You just need to find your song in MIDI format (with .mid as file extension), and let our Python Transcriber do its magic!

訳:

好きな曲をギターで簡単に弾けるようになりたいけれど、その方法がわからないということがありませんか?MIDIからタブ譜へ変換する私達のPythonライブラリは、その悩みに役立ちます。必要なのは、曲のMIDIデータを変換ライブラリに通すことだけです。

ギター下手マンとしてはだいぶ気になっていた発表だったけど、実際に聴くと今ひとつ面白さが伝わってこなかったのが残念。

そう思っている時期が私にもありました(´・ω・`)

Closing Keynote

Run your ICO using Python

by Abhishek Pandey, Senior Developer at Tilde Trading

仮想通貨についての基調講演。

PyCon APAC 2018 Day 1

【2018.7.2 追記】トークの発表資料への追加

シンガポールで開催されているPyCon APAC 2018にやってきた。

海外のカンファレンスは初めて、シンガポールも初上陸。

PyCon APAC ツアー

初海外カンファレンスなうえに海外経験が少ないのでPyCon JPが企画するAPACツアーに参加しての旅だった。Pythonエンジニア仲間と行くと心強いし楽しい。

PyCon JP Blog: PyCon APAC 2018 in シンガポール のツアー参加者募集

シンガポール上陸当日

上陸した5月31日の天気は悪かった。昼を食べ終わる頃には雨になり、あまり観光できずに宿に戻ることとなった。

夜は現地で働いているonodaさん、APACのスポンサーのHDEのメンバーとHolland Villageにあるイタリア料理店で夕飯。その後は近くにあった屋台街めいたところで二次会となった。いっつもビール飲んでるな。

一日に2度もタワービールと対面するとは。

Day 1

PyCon APAC 2018の会場はNUS(National University of Singapore)。

f:id:Nao_Y:20180601165901j:plain

School of Computingの2階に上がると受付。

f:id:Nao_Y:20180601170019j:plain

ここでTシャツをゲット。乾きやすい生地になっているのが東南アジア感ある。

スポンサーブースではいつもお世話になっているPyCharmのJetBrainsのブースでPyCharmステッカーとハンドスピナーをもらった。

次の日に貼った。

カンファレンス後はAPACツアー勢、onodaさんと共に宿近くのショッピングモールに入っているフードコートで夕飯。鶏肉が入ったアジアンなスープを食べた。

その後はビールをキメた。飲んでばっかりでは。

Opening Keynote

Day1の基調講演はKatharine Jarmul。ドイツでデータサイエンスのコンサルをやっているkjamistanの創業者。

機械学習システムにおけるプライバシーというテーマの講演。

f:id:Nao_Y:20180601170931j:plain

Google Assistantが学習した音声情報はどうやって収集されたのかという疑問をきっかけに、データを収集、訓練データとして使うときにエンジニアが注意しなければならないことに繋がった。

  • 倫理的なデータセット

    • ユーザからデータを収集するという契約は明示的にする( Zen of PythonのExplicit is better than Implicit.になぞらえて)
  • 収集するデータについてユーザとの合意を得る

  • 匿名化(Anonymazation)や仮名化(Pseudonymization)を施す

なんとか聴き取れた範囲はこのくらい。英語力の無さ……。

最後にオーディエンス全員で「I am a Data Guardian」と声を合わせたりした。

f:id:Nao_Y:20180601172735j:plain

GDPRが話題になっているタイミングに合った話だったと思う(小並感

Talk

聞いたトークのサマリーを訳してみる。

全体のスケジュールはConference Schedule | PyCon APAC 2018

Introduce Syntax and History of Python from 2.4 to 3.6

by Manabu Terada, Founder and CEO at CMS Communications Inc.

資料: manabu-terada-introduce-syntax-and-history-of-python-from-2.4-to-3.6.pdf - Google ドライブ

CMSコミュケーションズの寺田さん。一般社団法人PyCon JPの理事でもある。

今回のPyCon APACツアーを企画していただいた。多謝。

The speaker will introduce the new syntax and functions between Python 2.4 and Python 3.6 in this talk. I will also compare the old style to the new style. You will learn the best practices for Python coding and how to perform refactoring your old Python code. You can look at the evolution of Python.

訳:

Python2.4から3.6の間に登場した新しい文法と関数の紹介と旧スタイルと新スタイルの比較。Pythonの進化の道筋をたどることで、古いPythonのコードをリファクタリングする際のベストプラクティスが学べるだろう。

Teaching Computers ABCs: A Quick Intro to Natural Language Processing

by Lory Nunez, Data Scientist/Data Engineer at J.P. Morgan

資料: loryfel-nunez-teaching-computers-abc.pdf - Google ドライブ

Natural Language Processing (NLP) is a component of Artificial Intelligence. Knowledge of NLP can make unstructured text data add tremendous value to any application. We will go over basic NLP tasks, techniques and tools. We will end with an NLP app built from open source libraries.

訳:

自然言語処理はAIを構成する要素である。自然言語処理によって、構造化されていないテキストデータがさまざまアプリケーションに大きな価値を与えられるようになる。ここでは、基本的な自然言語処理のテクニック、ツール、ユースケース、そしてオープンソースライブラリを使って自然言語処理アプリケーションを作る方法について発表する。

サンプルアプリ(Wikipediaの文章を用いて人名同士の類似度を測るアプリ・ツイートをクラス分けして災害時のトリアージを行うアプリ)が紹介されたが、アクセスできなくなっている(´・ω・`)

Dockerizing Django

by Ernst Haagsman, Product Marketing Manager for PyCharm at JetBrains

資料: Release pycon_apac_2018 · ErnstHaagsman/ecs-talk · GitHub

Docker helps make sure that the Django application you develop is exactly the same as the Django application you eventually deploy. In this talk, you will learn how to containerize a Django application, and use docker-compose to connect your Django application to your entire stack.

訳:

Dockerは、開発したDjangoアプリケーションと最終的にデプロイしたアプリケーションが同一であることを確認する際に役立つ。Djangoアプリケーションのコンテナ化と、アプリケーションをdocker-composeで管理しているサービスに接続する方法を紹介する。

このリポジトリやブログの記事(Using Docker Compose on Windows in PyCharm | PyCharm Blog )が元になっているようだ。

github.com

Build a Data-Driven Web App That Everyone Can Use

by Galuh Sahid, Data Engineer at Midtrans

資料: galuh-sahidbuilding-a-data-driven-web-app-that-everyone-can-use.pdf - Google ドライブ

You're a data scientist with a machine learning model that you want to show everyone. Do you give your users your Python scripts and tell them to run "python mycoolmodel.py"? Is there a better alternative? How about a web app? The speaker will show you how Flask can be the best fit pun intended for this case.

訳:

データサイエンティストのあなたは自分が作った機械学習モデルをみんなに使ってもらいたいと考えている。そんなときに「mycoolmodel.pyと名付けたファイルをpythonコマンドで実行してください」とみんなに伝えていないだろうか。他にもっと良い方法があるのではないか?Webアプリにするのはどうだろう。この発表ではFlaskを用いて機械学習モデルをWebアプリ化するベストな方法を紹介する。

レベル感として今回のトークの中で最も面白いと感じられた。Flaskは少しチュートリアルをやればWebアプリが書けるし、機械学習モデルもKaggleのタイタニックのやつを解説している記事に沿えば作れそう。復習したいので動画公開が待ち遠しい。

Closing Keynote

The Python QuantsのCEO、Dr. Yves Hilpisch。

いわゆるFinPyの分野の話なのだけど、そっち方面の知識がゼロなのでついていくことができなかった……。


Day 1の話はこれにて終わり。Day 2に続く。